Image segmentation with SAM
Facebook Research's Segment Anything model is highly capable at detecting objects in images. In this tutorial we'll deploy the Segment Anything model to a REST endpoint to make an image segmentation API.
We'll follow the sample code in Segment Anythings getting started notebook to initialize the model and add some helper functions. Then we'll deploy to Modelbit.

Environment setup
Install Segment Anything from their git repository:
pip install git+https://github.com/facebookresearch/segment-anything.git
Install the packages we'll need to run Segment Anything:
pip install --extra-index-url=https://download.pytorch.org/whl/ \
    torch==2.0.1+cpu torchvision==0.15.2 opencv-python==4.8.0.74 matplotlib==3.7.2
And download a Segment Anything checkpoint file:
wget https://dl.fbaipublicfiles.com/segment_anything/sam_vit_b_01ec64.pth
Helper functions
Now we'll define several helper functions to process image data with Segment Anything.
These functions paint segmentation mask onto the original image, so it's easy for us humans to see.
import numpy as np
import torch
import matplotlib.pyplot as plt
import cv2

def show_mask(mask, ax, random_color=False):
    if random_color:
        color = np.concatenate([np.random.random(3), np.array([0.6])], axis=0)
    else:
        color = np.array([30/255, 144/255, 255/255, 0.6])
    h, w = mask.shape[-2:]
    mask_image = mask.reshape(h, w, 1) * color.reshape(1, 1, -1)
    ax.imshow(mask_image)

def show_points(coords, labels, ax, marker_size=375):
    pos_points = coords[labels==1]
    neg_points = coords[labels==0]
    ax.scatter(pos_points[:, 0], pos_points[:, 1], color='yellow', marker='*', s=marker_size, edgecolor='white', linewidth=1.25)
    ax.scatter(neg_points[:, 0], neg_points[:, 1], color='red', marker='*', s=marker_size, edgecolor='white', linewidth=1.25)

def show_box(box, ax):
    x0, y0 = box[0], box[1]
    w, h = box[2] - box[0], box[3] - box[1]
    ax.add_patch(plt.Rectangle((x0, y0), w, h, edgecolor='green', facecolor=(0,0,0,0), lw=2))
And these functions draw a bounding box around the segmentation mask:
def get_bounding_box(mask):
    x_min = None
    x_max = None
    y_min = None
    y_max = None
    for y, row in enumerate(mask):
        for x, val in enumerate(row):
            if val:
                if x_min is None or x_min > x:
                    x_min = x
                if y_min is None or y_min > y:
                    y_min = y
                if x_max is None or x_max < x:
                    x_max = x
                if y_max is None or y_max < y:
                    y_max = y
    return x_min, y_min, x_max, y_max

def show_box(box, ax):
    x0, y0 = box[0], box[1]
    w, h = box[2] - box[0], box[3] - box[1]
    ax.add_patch(
        plt.Rectangle((x0, y0),
                      w,
                      h,
                      edgecolor='yellow',
                      facecolor=(0, 0, 0, 0),
                      lw=2))
Load the model
Loading the the Segment Anything model involves loading the checkpoint file downloaded earlier, and initializing a SamPredictor:
from segment_anything import SamPredictor, sam_model_registry
sam = sam_model_registry["vit_b"](checkpoint="sam_vit_b_01ec64.pth")
predictor = SamPredictor(sam)
Make a function to segment images
As the last step before we deploy, we need to use all the previous functions to segment an image, draw the segmentation graphics onto the image, and return the bounding box of the segment.
We'll bundle this logic into a function that takes the image URL we want to segment, and the X and Y coordinates of a point inside the image where our segment should focus:
import requests

def segment_image(image_url, point_x, point_y):
    # download the image into cv2
    resp = requests.get(image_url)
    image = np.asarray(bytearray(resp.content))
    image = cv2.imdecode(image, -1)
    image = cv2.cvtColor(image, cv2.COLOR_BGR2RGB)

    # load the image into Segment Anything and get the segment mask
    predictor.set_image(image)
    input_point = np.array([[point_x, point_y]])
    input_label = np.array([1])
    mask, score, logit = predictor.predict(
        point_coords=input_point,
        point_labels=input_label,
        multimask_output=False,
    )
    mask = mask[0]

    # Draw the image, the point we selected, the mask, and the bounding box
    fig = plt.figure(figsize=(10,10))
    plt.imshow(image)
    show_mask(mask, plt.gca())
    show_points(input_point, input_label, plt.gca())
    bbox = get_bounding_box(mask)
    show_box(bbox, plt.gca())
    plt.show()
    mb.log_image(fig) # show the segmented image in modelbit logs

    # return the bounding box of our segment
    return bbox
We're using mb.log_image in the above code to log images generated in the REST API to Modelbit logs.
Test and deploy the segment API
Log into Modelbit:
import modelbit

mb = modelbit.login()
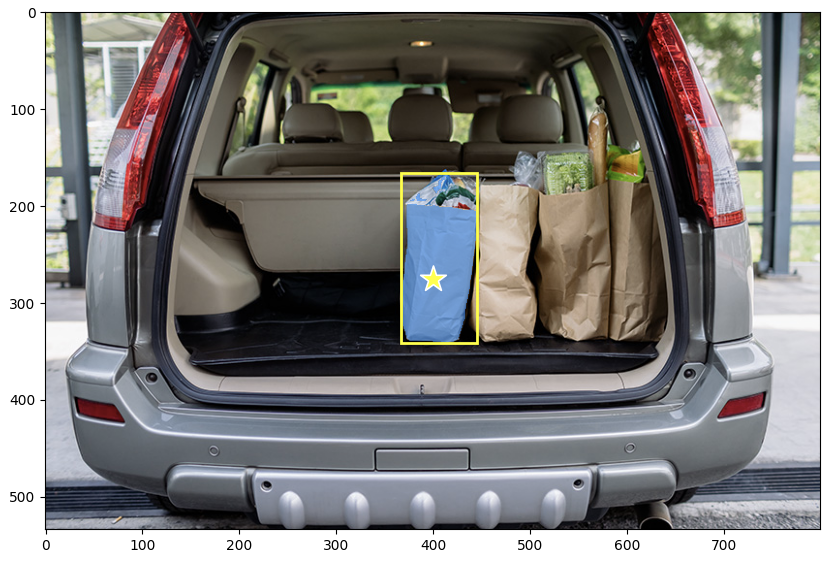
And test that the segment_image function works. We'll test it with a picture of a successful shopping trip, and we'll segment out a bag of groceries:
image_url = "https://doc.modelbit.com/img/groceries.jpg"
segment_image(image_url, 400, 275)
Which we can see in our notebook:
Finally, deploy the segment_image function to Modelbit. We'll include the git repo and the versions of torch we're using in python_packages:
mb.deploy(segment_image, python_packages=[
    "git+https://github.com/facebookresearch/segment-anything.git",
    "torch==2.0.1+cpu",
    "torchvision==0.15.2"
])
Once deployed, call the segmentation API over REST to get bounding boxes of image segments!
curl -s -XPOST "https://<your-workspace-url>/v1/segment_image/latest" \
  -d '{"data": ["https://doc.modelbit.com/img/groceries.jpg", 400, 275]}' | json_pp
{
  "data": [367, 166, 445, 341]
}
Your Modelbit workspace may not be configured with enough resources for large image models like Segment Anything. If you hit an Out of Memory issue, contact Modelbit Support to upgrade your environment.